There’s something so satisfying about creating your own accessories, especially when they’re as fun and practical as fabric hair scrunchies. I love how they add a pop of color to any outfit while being gentle on my hair. Plus, making them yourself means you can customize the fabrics and sizes to match your personal style.
Benefits Of Sewing A Fabric Hair Scrunchie Set
Sewing a fabric hair scrunchie set provides creative control over materials and design. By selecting fabrics like cotton, velvet, or silk, I can match seasonal trends or personal preferences. Customizing colors and patterns lets me align the scrunchies with outfits or gift themes.
Handmade scrunchies are more durable compared to store-bought ones. Using quality elastic and sturdy stitching techniques ensures they withstand frequent use without losing elasticity or shape. For example, a zigzag stitch around the elastic adds extra reinforcement.
Fabric scrunchies protect hair by reducing tension and friction. Unlike tight hair ties, they prevent breakage and split ends. Silk or satin options are particularly gentle, making them ideal for delicate or fine hair.
These sewing projects are cost-effective. By using fabric remnants or upcycling old clothes, I can create multiple scrunchies without spending much. It’s an eco-conscious way to repurpose materials while reducing waste.
Crafting a scrunchie set also enhances sewing skills. Measuring, cutting, and stitching smaller items develop precision and introduce techniques like hemming or elastic insertion. It’s perfect for building confidence in beginners or experimenting with advanced details like trim accents.


Tools And Materials Needed
Creating a fabric hair scrunchie set requires the right tools and materials to ensure quality results. I focus on using items that simplify the process while achieving durable and stylish scrunchies.
Fabric Selection Tips
Choosing fabric impacts the scrunchie’s appearance and function. I usually favor cotton for its ease of sewing and durability. For a more elegant look, silk or satin works beautifully, as these materials reduce hair friction. Velvet adds a luxurious texture and works great for colder seasons. Lightweight fabrics provide flexibility, while thicker materials create more structure. Reusing fabric scraps or upcycling old clothes keeps it affordable and eco-conscious.
Essential Sewing Tools
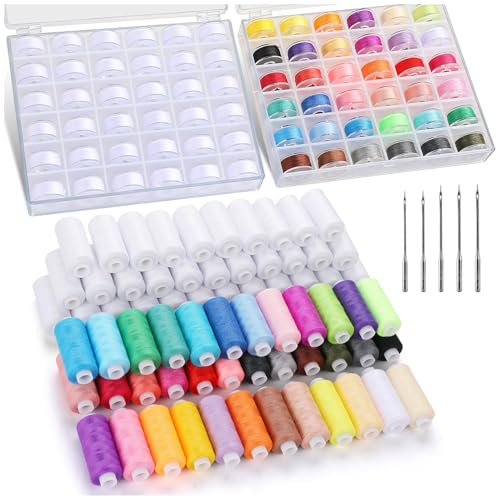
Reliable tools enhance efficiency and precision. I always use sharp fabric scissors for clean cuts. A measuring tape ensures uniform sizes, while fabric pins or clips hold pieces together securely during sewing. A sewing machine speeds up the process, but a needle and thread work for hand-sewing. When threading elastic, I rely on a safety pin to guide it through the fabric channel. A fabric marker or chalk helps mark measurements without leaving permanent stains.


Additional Accessories
Some extras simplify assembly and improve results. I often use ¼-inch or ½-inch elastic, depending on the desired stretch and hold. A ruler helps maintain consistent dimensions across scrunchies. Plenty of thread in matching or contrasting colors ensures strong seams. If gifting scrunchies, I recommend decorative ribbons or tags for a finished touch. Lastly, a pressing iron neatly flattens fabric edges for a polished look.
Step-By-Step Guide To Sewing A Fabric Hair Scrunchie Set
Creating a fabric hair scrunchie set is a simple and enjoyable project that’s perfect for beginners and experienced sewists. Follow these steps to make a polished and durable scrunchie set.
Cutting The Fabric
I begin by selecting my desired fabric. Each scrunchie requires a fabric strip measuring about 22 inches in length and 4 inches in width. I use a rotary cutter and a cutting mat to achieve straight edges. Precision here ensures easier stitching later.
Stitching The Scrunchie
I fold the fabric lengthwise with the right sides facing in, aligning the edges carefully. Securing the fabric with pins, I stitch along the long edge using a ¼-inch seam allowance, leaving the short ends open. After stitching, I turn the tube right side out using a safety pin or a chopstick to avoid damaging the fabric.
Adding The Elastic
I cut a piece of elastic about 7 inches long for a snug fit. Using a safety pin, I thread the elastic through the fabric tube, ensuring I hold onto the other elastic end to prevent it from slipping inside. Once threaded, I overlap the elastic ends by about ½ inch and sew them securely using a zigzag stitch.

Final Touches And Finishing
I tuck the raw fabric edges on one open end into the other, ensuring they overlap slightly to create a neat finish. I stitch the overlapping edges together using a ladder stitch or straight stitch for durability. Finally, I press the scrunchie gently with a low-heat iron if necessary, enhancing its polished look.
Creative Tips For Customizing Your Scrunchie Set
Customizing a scrunchie set transforms a simple sewing project into a personal statement. With the right touches, scrunchies can reflect unique styles and creativity.
Experimenting With Patterns And Colors
Incorporating a variety of patterns and colors elevates a scrunchie’s appeal. I opt for floral prints in spring, bold geometric patterns for an edgy look, or classic solid shades that pair with any outfit. Mixing contrasting colors, like pairing light pastels with darker tones, creates eye-catching combinations. Using seasonal colors, such as warm shades for fall or icy tones for winter, keeps the scrunchies aligned with trends.
I also blend textures by combining silky fabrics with matte ones, creating visual contrast. Layering two fabrics in one scrunchie, like patterned cotton over a satin base, gives a standout design. These choices make each scrunchie distinct and stylish.
Adding Decorative Details
Decorative elements transform ordinary scrunchies into custom accessories. I often sew in lace trims for delicate detailing or attach small bows for extra flair. Adding beads or sequins along the outer edge gives a touch of sparkle, perfect for dressy occasions.
« How to Sew a Tablecloth for Your Dining Room: Easy DIY Guide to Elevate Your Home Décor
Step-by-Step Guide to Sewing a Travel Laundry Bag: A Fun & Easy DIY Project You’ll Love »
For a bohemian vibe, I stitch tassels or fringes onto the scrunchies. Embroidering initials or small designs like flowers using thin thread personalizes the accessory further. Another option I love is attaching petite charms, such as stars or hearts, to the elastic. These additions allow scrunchies to double as unique, hand-crafted gifts.
Common Mistakes To Avoid
Overlooking fabric type compromises both appearance and function. Using stiff or overly delicate fabrics, like canvas or chiffon, makes it harder to gather material smoothly or may lead to tearing. I recommend using soft, durable options like cotton, satin, or silk for best results.
Incorrect measurements lead to wasted material or poorly fitting scrunchies. Not measuring elastic length accurately can make the scrunchie too tight or too loose. For most scrunchies, using elastic about 2-3 inches shorter than the fabric length works well.
Skipping ironing during the process results in uneven seams. Pressing the fabric before and after sewing helps achieve crisp edges and a professional finish.
Neglecting seam allowances weakens the scrunchie’s structure. Sewing too close to the edge risks fraying or popped seams. I stick to a 1/4 or 1/2-inch allowance for a durable build.

Using dull scissors causes jagged edges. Clean cuts are essential for neat final products. I suggest keeping fabric scissors sharp and reserved solely for fabric use.
Rushing through the stitching process often creates crooked seams. Take time to ensure straight and even stitches, checking alignment as you sew.
Forgetting to secure the elastic results in loose or detached scrunchies. Always double-stitch the elastic ends securely before inserting them into the fabric tube.
Mismatching thread color and fabric reduces the aesthetic quality of the scrunchie. Choose thread that closely matches the fabric or use clear thread for versatility.
By avoiding these errors, the sewing process becomes smoother and yields better results.

Conclusion
Sewing your own fabric hair scrunchies is such a rewarding and creative experience. It’s a chance to express your personal style, improve your sewing skills, and make something both beautiful and practical. Plus, knowing you’ve crafted something with care makes it even more special.
Whether you’re upcycling old fabrics or experimenting with new designs, the possibilities are endless. Each scrunchie becomes a little piece of art that’s uniquely yours. So grab your materials, let your creativity flow, and enjoy the process of making something fun and functional. You’ll love the results!