So you’ve noticed your trusty sewing machine is no longer running as smoothly as it used to, or worse, it’s not running at all. Don’t panic! More often than not, the issue lies with a worn-out motor. But here’s some good news: you can replace your sewing machine motor and get back to stitching in no time.
You might be thinking, “I’m not a mechanic!” That’s okay; you don’t have to be one. With a bit of guidance and patience, replacing your sewing machine’s motor is something you can totally handle on your own – saving both time and money!
Before we proceed though, remember this golden rule: always unplug any appliance before trying to fix it – safety first! Let’s then dive into how you can easily replace that stubborn old motor and give new life to your beloved sewing machine.
Understanding Your Sewing Machine Motor
Diving headfirst into the world of sewing, you’ll soon realize that your sewing machine is more than just a needle and thread. One critical component hiding beneath the surface is the motor. Now, you might be wondering what exactly does this motor do? Well, it’s pretty simple: it’s the powerhouse that drives your machine.
The type of motor your sewing machine has can significantly impact its performance. There are generally two types to consider: mechanical and electronic motors. Mechanical ones are your old-school workhorses; they’re robust, reliable but lack speed control. On the flip side, electronic motors offer precision with adjustable speed but at a higher price point.
Let’s talk about power for a minute. It’s measured in watts – higher watts mean more power! The average home-use sewing machine motor ranges from 50-100 watts. But if you’re getting serious about heavy-duty fabrics or frequent use, you might want to invest in something with a bit more oomph!


Just like any other part of your beloved sewing machine, motors don’t last forever. But don’t panic! Replacing them isn’t as daunting as it seems – all it takes is a little patience and some basic tools.
Finally, remember to keep an eye (and ear) on your motor’s health! Strange noises or decreased performance could indicate it’s time for a check-up or replacement. Being proactive will save you from unnecessary headaches down the line and ensure smooth stitching sessions ahead!
So now you have taken one step further into understanding your sewing machine better by learning about its heart – the motor!


Determining the Need to Replace a Sewing Machine Motor
Ever had your sewing machine act up on you? Yeah, it’s frustrating. One of the key culprits might be a worn-out motor. But how do you figure out if your precious sewing machine needs a new motor or not? Let’s dive in!
When you’re dealing with a sluggish sewing machine, it can be tempting to blame the needle or thread. However, sometimes it’s the motor that’s causing all the drama. The first sign could be an unusual noise. Motors should hum along smoothly, but when they start grumbling or making high-pitched sounds, that’s usually trouble.
If noises aren’t giving you clues, look for changes in performance. Is your machine struggling with stitch speed? A lagging motor just won’t keep up like it used to and may leave you hanging mid-project. Or maybe it’s feeling unusually hot after running for short periods – another red flag!
Your sewing patterns can also offer hints about your motor health. Are your stitches looking uneven or looser than usual? It could be due to an underpowered motor unable to maintain consistent tension.
Lastly, let’s talk age factor here! If your faithful companion has been chugging along for decades without any major repairs, chances are its motor is nearing retirement.

So there we have it! While these signs don’t guarantee a failing motor, they’re certainly worth investigating before hitting panic mode and rushing for a replacement!
Preparation Steps for Motor Replacement
Before we dive straight into the nitty-gritty of swapping out your sewing machine’s motor, it’s essential to gear up with a few preparation steps. First things first, you’ll need to gather the right tools. A small flat-head screwdriver and some needle-nose pliers should do the trick. Don’t forget a new sewing machine motor that is compatible with your model.
Next up, let’s talk safety. Unplugging your machine from its power source is not just recommended—it’s downright necessary! You really don’t want an electrical mishap on your hands while tinkering around with internal components.
Once you’ve got everything unplugged and all your tools ready, it’s time to get yourself acquainted with the inner workings of your sewing machine. If you’re feeling lost or confused, don’t worry—that’s normal! A strong recommendation would be referring to your sewing machine’s manual or doing a quick search online for specific parts and their locations within the machine.
You see, replacing a motor isn’t as intimidating as it sounds if done methodically and carefully. The key thing here is patience; take your time inspecting each part before removing anything.
« Can You Embroider With Sewing Thread? Unraveling the Truth for Your Craft Projects
Fix Sewing Machine Timing: Your Quick and Easy Guide to DIY Repairs »
And lastly, ensure that there’s ample lighting in your workspace because you’ll be dealing with small screws and delicate parts which are often nestled deep inside the machinery—no place for shadows or subpar visibility!
By following these steps diligently, rest assured that half of this DIY battle is already won! Now onto the actual replacement process… stay tuned for more in our next section: “Replacing Your Sewing Machine Motor”.
Purchasing the Right Replacement Motor
Before you jump into it, let’s make sure we’re on the same page. You can’t just buy any old motor and expect your sewing machine to hum like a songbird. Nope, you need the right one. So here’s what you gotta know.
First off, check out your sewing machine manual. That little book that came with your machine? Yeah, it’s more than just an ornament for your coffee table. It’ll list the exact specifications of your current motor – stuff like voltage, speed control type, and power wattage. Jot these down because they’re gonna be important when selecting a replacement.
Now that you’ve got that info in hand, it’s time to hit the shops (or websites). But wait – don’t get too click-happy just yet! Take some time exploring different brands and models. Pay attention to customer reviews and ratings – they can be real life-savers!

Here are some top-rated brands worth considering:
- SINGER
- Brother
- Janome
- Elna
Remember though – not all motors from these brands will fit every sewing machine model! Make sure to double-check those specs you noted earlier against each potential candidate.
And finally – price versus quality is always a thing, right? We all love a good bargain but remember: if it seems too good to be true… well, you know how that goes. Don’t skimp on this crucial part of your beloved sewing machine; investing in a high-quality replacement motor now could save you plenty of headaches (and heartaches!) later down the line.
So there ya go! Armed with these tips and tricks up your sleeve, finding the perfect replacement motor for your trusty sewing machine should be a breeze.
Step-by-Step Guide to Replace Sewing Machine Motor
So, you’ve got a sewing machine that’s been acting up? If it’s not stitching like it used to, the culprit might just be the motor. Let’s dive right in and explore how you can replace your sewing machine motor with ease. But remember, always unplug your sewing machine before starting any repair work!

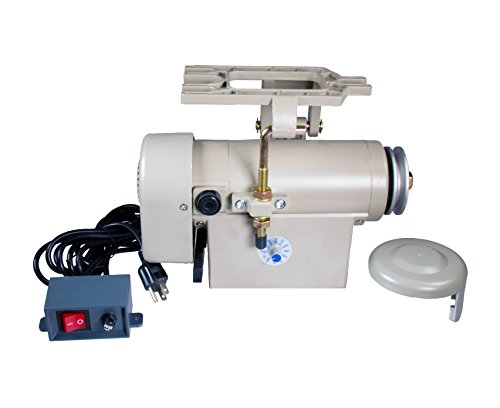
First off, let’s identify what kind of motor your machine has. There are two main types: belt-driven motors and direct-drive motors. You’ll need to know this when buying a replacement because they’re not interchangeable.
- Belt-driven motors have a visible belt connecting them to the handwheel.
- Direct-drive motors are connected directly to the handwheel without any visible means.
Now onto the removal process! Start by loosening screws or bolts holding the motor in place – there should be at least two for most models. Once those are out of way, carefully remove the old motor ensuring not to damage any surrounding parts.
Next comes installing your new motor! It’s pretty much reversing what you’ve done so far:
- Position it where the old one was,
- Secure it using screws
- And finally connect it back via belt (for belt-driven) or directly (for direct-drive).
And voila! You’ve successfully replaced your sewing machine motor.
One last piece of advice: always test-run after installation as some fine-tuning may be needed for optimal performance – don’t forget that every model is different so patience is key here!

While replacing a sewing machine motor may seem daunting at first, with these steps in hand, you’ll find yourself sailing smoothly through this DIY project!
Safety Precactions During Sewing Machine Motor Replacement
Safety first! That’s your mantra when you’re about to replace the motor in your sewing machine. Replacing a sewing machine motor isn’t overly complicated, but it does require careful attention and adherence to safety measures.
Let’s talk electricity first. It’s absolutely crucial that you unplug your sewing machine before starting any work on it. This might seem like common sense, but in the excitement of tackling a new repair job, it can be easy to forget this crucial step. You don’t want any unexpected jolts while you’re knee-deep in wires and motors!
Next up, let’s chat about workspace organization. Keeping your workspace clean and tidy is not just good for efficiency – it’s also key for safety. Loose screws or tools can easily cause accidents if they are left scattered around your work area. So make sure everything has its own place before you start working.
Now onto the actual replacement process! When removing the old motor from your sewing machine, remember to handle with care. These parts can be delicate and forcing them could result in damage to either the part or yourself.

And finally – always keep an eye on those fingers! It may sound silly but when dealing with small parts and potentially sharp tools, it’s all too easy for slips to happen.
Follow these steps carefully, respect the process and put safety at the forefront of everything you do during this task – after all, we want you back here again fixing up more stuff safely!
Maintenance Tips for Longer Lifespan of Sewing Machine Motors
Let’s dive right into some practical tips to maximize the lifespan of your sewing machine motor. First and foremost, you’ve got to keep it clean. Dust and lint can easily accumulate in the motor, which could lead to overheating or even burnout. So, make it a routine to give your machine a proper clean-up after each project.
Another tip that might seem obvious but is often overlooked is reading the manual. Your sewing machine’s manual isn’t just a bunch of boring text – it’s packed with valuable information specifically tailored for your machine model. You’ll find guidelines on how often you should lubricate your motor and what type of oil you should use.
The next thing you want to do is avoid overworking your sewing machine. Yes, we know how easy it is to lose track of time when you’re engrossed in a project, but remember: machines need rest too! Running them non-stop for hours will inevitably cause wear and tear faster than necessary.

Something else worth considering: using quality thread. It may sound strange at first, but cheap threads tend to produce more lint which can clog up the motor over time. Opting for high-quality thread can be an investment not only in your projects’ outcome but also in prolonging your sewing machine’s life.
Lastly, don’t underestimate the power of regular professional servicing – think of it as a spa day for your hard-working sewing companion! A professional will have all the tools needed to thoroughly inspect, clean and repair any potential issues before they become bigger problems down the line.
Conclusion: Ensuring Smooth Operation with Properly Replaced Motors
So, you’ve made it to the end of your sewing machine motor replacement journey. It’s quite a task, isn’t it? But remember, ensuring smooth operation is all about how well you replaced that motor.
Having a properly replaced motor means no more frustrating moments of your machine stalling mid-stitch. You’ll notice an immediate difference in the way your sewing machine runs. It’s smoother, quieter and just feels right. That’s the kind of magic a new motor can bring!
And let’s not forget how important regular maintenance is for keeping things ticking along nicely:

- Cleaning out lint and dust regularly
- Oiling moving parts as recommended by the manufacturer
- Changing needles frequently
These steps might seem small, but they’re mighty when it comes to extending the life of your sewing machine.
Let’s say you’ve done all this and something still doesn’t feel quite right. If that happens, don’t hesitate to consult with an expert or reach out to other sewers online who have been in your shoes before. Remember, there’s no such thing as a silly question when you’re learning something new.
In conclusion, replacing a sewing machine motor might seem daunting at first glance, but with patience and attention to detail – it can be DIY’d like any other home project! So take pride in what you’ve accomplished here today – because now you know exactly what it takes to keep your beloved sewing gadget running smoothly!